(This article may be reproduced for noncommercial
purposes only if it is copied in its entirety, including this
notice and all notices of copyright and authorship contained on
the originating web page at www.technicalaudio.com and in the article itself - information directing
readers to the TechnicalAudio.com web site would be appreciated - (c) 1995 - 2013 by John Klett,
Carmel, NY) CONTACT
- John Klett
Neve "80 Series" Modules - Part One - The 1081
Channel Amplifier
by John Klett (c) 1995 - 2013 by John Klett, Carmel,
NY
http://www.technicalaudio.com
This article was written by John Klett. The original version was done in 1995 for an online magazine called Micronic Music Makers Online. Micronic was a New York Recording and Music Industry BBS and Web site. That enterprise dropped offline at the end of 1995 (because they could not successfully make the migration from the BBS to the Web... so the article was moved to this web site (www.technicalaudio.com) for people to read. In August 1997 there were some minor updates that anticipated a second article from Klett that had in the works concerning the 1073 module and its cousins - as of 2009 this has still not happened. Some time before the web becomes obsolete I hope to get this done. If you want reach John Klett go HERE
Neve "80 Series" Modules
The 1081 Channel Amplifier
I'm going to run down some of the various aspects involved
with Neve "80 Series" Channel Amplifier modules. I have
one on my bench that is pretty typical in terms of what I get
in for repair and refurb and I'll review what I did with that
one. When the U.S. Neve office was in Bethel, CT they used to
have me come over and rework modules for them or they would send
them to me here to do them at my shop. Between the work for Neve
and, later, Siemens [and now it's AMS/Neve] and what I get in
from customers I have gotten to know the modules well. Let's review
some of the things that would be good to know about.
First a disclaimer... I am going to present some information for
your pleasure. I'll go into some technical things but I'll be
simplifying quite a bit - mainly to preserve time and space. I
am trying to present what I will call a "deep overview".
Don't view this information as complete or absolutely accurate
- I am TRYING to be accurate but I am skipping over things to
save space. I am also going to express some opinions so be careful
- I am not always right. Use what I present to stimulate your
own thoughts and add to. On its own this article will not make
anyone more technically qualified to poke into the guts of a Neve
EQ module than they were before. Your Action - Your Responsibility.
I am merely putting words in a row. .... and that should cover
the disclaimer.
The Neve 80 (Eight-Oh) Series consoles are based on a number of
standardized modules that have 1-3/4" front panel widths
and were mounted in console frames with a center to center spacing
of 45mm. The heights of the modules vary to match the profile
of the console. There are a related series of consoles and modules
that were made at the same time as the 80 Series called the 53
Series. The 53 Series Consoles share a lot of the circuitry with
the 80 Series but the modules are narrower and most of the consoles
are oriented toward broadcast, live and remote recording applications
where a more compact format is required. The standard panel width
in the 53/54 Series is 35mm. Most of the discussion here will
revolve around the channel amplifiers that were used in the 80
Series Consoles including the 8016, 8024, 8028, 8034, 8036, 8038,
8048 and 8078 split monitor consoles and the 8058, 8068 and 8088
in-line monitor consoles.
There are a number of different types of modules. The Channel
Amplifiers are the ones that most people want to buy and use as
stand-alone mic preamps and EQ's. Switcher Modules and Routing
Modules would be the others involved in a channel strip with the
fader. Line Amplifiers (primarily the 1271 and 1272 in the 80
Series and the 3415/33415 in the 53 Series) were used for makeup
gain on summing busses and as output boosters - these are in demand
today because they can be converted for use as mic preamps (with
some limitations on gain and some sacrifice in distortion, bandwidth
and noise at gains over 55dB or 60dB). Functions like distribution
amplifiers (1276 and 3411/33412), Oscillators (1458, 1461, 1466
and others), Limiter/Compressors (2253, 2254/32254 square, 2264/32264
45mm) and others rounded out the collection of modules needed
to make a complete console. Neve sold channel amplifiers and other
modules individually but mostly the ones that people buy and use
as outboard mic preamps and eq's came out of consoles that have
been broken up to be sold off bit by bit. Sometimes a console
is worth less as a console than it is as parts.
[AMS / Neve recently (mid-1997) began manufacturing the 1081
module again and these are available on a limited basis for around
$4000 per channel amplifier. I had a chance to audition and do
some fairly serious A/B testing of these new 1081's in late 1997
and they are quite good.]
A Channel Amplifier usually includes a mic preamp and an equalizer. Many models have an additional line input. There are a few modules with only a line input and EQ but no mic preamp and there are a couple that have only a mic preamp and an output booster but no EQ. The Neve 80 and 53/54 Series Channel Amplifiers include (this is NOT a complete list) 1061, 1064, 1064/A, 1065, 1066, 1067, 1070, 1073, 1076, 1078, 1079, 1081, 1083, 1084, 1085, 1095, 1096, 1099, 31099, 31102, 31105, 3104, 3114, 33114, 3115, 33115 , 3117, 33117, 3126, 34120, 34128, and others. For the most part the circuitry in all these modules is discrete transistor as opposed to integrated circuits. Early Neve modules used germanium transistors (or geranium if you have kids - my kids used to think mom grew germaniums outside) but germanium transistors gave way to silicon (not silicone) transistors. There are differences between germanium and silicon transistors. Most people think germanium transistors are "bad" and silicon transistors are "good". While this may be true in some sense it is also true that a lot of really fine sounding gear was made with germanium transistors. They do have a different set of limitations (and some advantages) but with proper design and application some very good sounding modules came about i.e. the Neve 1053 and 1055 modules- these are the wide black faced modules that predate the 80 Series. There are some 80 Series modules that were made with IC's (integrated circuits) in the signal path but these are less common - and many can be converted to discrete transistor or (vice versa) if need be. Integrated circuits are still based on transistors but a bunch of transistors are made and connected together or "integrated" on one "substrate" and sold in one package called an IC. Most consoles made today (with the notable exception of API) are made using integrated circuits almost entirely. There are good arguments made on both sides as to which is good or bad between the discrete and integrated circuitry. I pretty much think it is more the application than the circuitry itself that determines good or bad. I design with both. For this article we won't dive into circuitry philosophy too much.
NOTE: 3116 - note that the 3116 does not have an output amplifier so while the preamp can be viewed as quite similar to a 1081 it does not have the same output or, for that matter, the same EQ topology. In dividing modules in to two families I sorted by amplifier type. 438 and 440 and some of the variants go into the "1081 camp". The modules built around these circuits are all different from each other in that some don't have outputs, like the 3116 and 3126 found in Kelso consoles. These have only a preamp and a simple EQ and in themselves can't drive much of a load and have a low output level... so as you read this article you must take in mind that I am making some broad and general statement and that ten or more years ago when I wrote this I was trying to fit a lot of information in a small place. The article about every variant of modules is not going to be done by me alone... too much work for no pay. (Klett - August 2006)
All the modules from 80 and 53 series consoles - that I know about
anyway - require a single 24 volt supply to operate. 48 volt phantom
power would be needed to power condenser microphones but most
of the time that was not routed through the channel amplifier.
In most of the old Neve consoles phantom power actually came from
a DC to DC converter that took in 24vdc and doubled it to 48vdc.
Quite often the phantom was dropped onto the mic lines right at
the XLR mic input connector panel on the back of the console frame.
It would be helpful to think of a power supply as a battery. Many
of the schematics for vintage equipment show the power as B+ and
B-. B stands for Battery and "B+" and "B-"
refer to the poles of the battery - even though the battery is
really a power supply. This is pretty common - it was the standard
way of showing supplies in the older documentation. In older tube
gear you'll often see actual battery symbols used even though
batteries were only sometimes present. Most of the channel amps
have the B- tied or "commoned" to ground. I often use
"ground", "common" and "0volts"
seemingly interchangeably in my conversation and writing. In fact
these terms do denote different things. In practice, though, most
of the time these three things are connected together somewhere
circuit-wise. Most modules have a positive supply (negative common)
but some (the ones with germanium transistors) have the B+ tied
to common and are actually powered by -24vdc - negative supply
(the 1061 is a negative supply module). It is a good idea to have
some documentation for the module you have so you can know what
you need to hook up and how.
Because the circuitry is single supply and discrete there are
capacitors used to "block" DC and "pass" audio.
It is possible to design single supply circuitry that has multiple
stages of amplification AND is fully DC coupled (no dc blocking
caps) but it is harder to implement - and not necessarily a safe
thing to do. The circuitry in the 80 Series modules and consoles
in general are AC coupled. There are also a number of capacitors
that are used to "decouple" or "filter" the
power supply near various amplifiers. Many of the capacitors are
aluminum electrolytics - especially the larger ones with values
over 22MF (that's Micro Farads). Aluminum electrolytic caps often
change with age or "dry out". They actually have a "wet"
chemical "electrolyte" (thus electrolytic) in them that
can dry up or vent out over time. When this happens the capacitance
value goes down and eventually the audio will be affected. I'll
go into the capacitor thing a bit further on.
All of the modules will have transformered inputs and outputs.
There may be some unbalanced ins and outs where a fader might
be inserted or maybe an unbalanced feed to something like an aux
send or assign module may be provided. In stand-alone use (in
most cases) only the main transformered ins and outs are used.
The output amplifiers in all these modules drive a big beefy output
transformer. Neve 80 Series channel amplifiers can be divided
into two broad categories having to do with what kind of circuits
they have. Two types of output amplifier circuits are commonly
used.
One of the amplifier types is what most people call the Class
A version and would most likely use a BA183A/V or BA283A/V plug
in card (BA283 from here on). This has a big "TO-3"
transistor on it. A TO-3 transistor looks like a flat metal can
about 3/4" in diameter and maybe 1/4" high with a rim
around it like a hat. The rim extends out in two places where
two screws go through to hold the transistor down. This is indeed
a Class A circuit. It is a single ended circuit - meaning it uses
one active element instead of a pair working in "push-pull".
The other type of amplifiers used are little square plug-in modules
- about an inch and a quarter square - with a flat square black
metal plate on top that acts as a heat sink. That amplifier would
be a Neve BA240, BA340 or BA440 amplifier. These are all Class
AB amplifiers and have the same basic circuit from one to the
next with small refinements. I like the BA-340 because there is
a bias trimmer pot. They use smaller transistors called T0-5's.
There is also a BA640 version that has an integrated circuit on
it that drives the same TO-5 transistor output stage the other
output amplifier modules use. The BA240/340/440/640 modules are
interchangeable with each other with the exception of the diameter
of the pins that plug onto the motherboard. The little pins and
receptacles are laid out the same with all the modules but two
sizes of pins and receptacles were implemented. That makes it
a fairly straight ahead deal to change the IC ones out for the
earlier discrete transistor versions - assuming you can find them
and assuming you get the pin diameters right - some surgery may
be required. The Class AB circuit is called a complimentary push-pull
emitter follower and is used to drive the output transformer or
any other low impedance load. Beside the output pair there is
a transistor that provides a bias that keeps both the output transistors
partly "on" even when signal is not present. So with
little or no signal the amplifier runs Class A. As the signal
gets louder and as the output swings more the transistors begin
to alternate or operate like a Class B amplifier but with greatly
reduced crossover distortion from what a real Class B amplifier
would have. Another way to look at it is a Class B amplifier switches
between the two transistors in an output pair where a Class AB
amplifier crossfades between them.
Another broad division in Neve modules can be made depending on
the configuration of the mic preamplifiers. The same modules that
used the BA283 Class A output amplifier also had a two stage mic
preamp. There were two amplifier boards used and each of these
has one or two amplifiers. The BA283 has the output amplifier
and a preamplifier on the same card. The preamplifier is used
for one of the two gain stages in the Mic/Line amplifier. The
other amplifier board used with the BA283 is the BA184 or BA284.
The BA284 has a second preamplifier stage identical to the one
found on the BA283. Also on the BA284 board are two additional
amplifiers used in the EQ circuit. The two stage mic preamp circuit
in these modules is considered by many to be superior to the one
in the 1081 that had a single stage amplifier based on another
plug-in module called a BA238, BA338 or BA438. Again people use
the "Class A" designation when referring to the two
stage mic preamp versions but outside of the BA440 output amplifiers
all the circuitry in both types of modules really is class A -
just different kinds.
So in general people run a dividing line through these modules
that put the ones with the two stage mic pre's and the single
ended Class A output amplifiers on one side. The 1061, 1064, 1064/A,
1065, 1066, 1067, 1070, 1073, 1076, 1078, 1079, 1099, 31099, and
31102 are all this group. On the other side are the Class AB versions
like the 1081, 1083, 3114, 3114/M, 33114, 3115, 33115, 3116, 3117
and 33117. When in doubt look inside. Those are a few things that
are good to know - now let's go into the specific example.
I was given a model 1081 EQ to repair and clean up. This is one
of my favorites and are found in 8036, 8038 and 8048 consoles.
The reason I like it is it has two Mid or Presence bands and all
the bands have more frequencies than most other Neve modules.
The 1081 has both a line and a mic input. Each input has its own
input transformer which is selected by the sensitivity switch.
The Hi Pass and Low Pass Filters each have 5 frequencies to choose
from. The High and Low Frequency Boost/Cut sections each have
5 frequencies to choose from and can be shelving or peaking. The
two Presence Boost/Cut sections each have ten frequencies to choose
from and can be switched to a narrower "Hi Q" response.
It runs on +24vdc (negative common) and has a BA440 amplifier
driving the output transformer. This is one of the more flexible
EQ's that came out of the 80 Series.
The 1081 module that I have came in not working at all. Most
of the time this is the output amplifier but I made a test jig
and tested it to make sure. A test jig is just the proper mating
connector for the given module that is wired up with power and
signal wiring to make it easy to connect to test equipment. I
have an Audio Precision P1+ but a Loft or Goldline TS-1 or just
about any oscillator, meter, scope, amp and a pair of speakers
can work for you. You may need an attenuator and a step down transformer
to run into the mic input. I have a CD player, a small amp and
a pair of speakers too and a 24 Volt Power Supply.
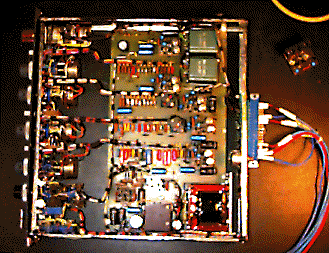
First I slide the sides off the module. Here is a GIF of the 1081
with the covers off .
The sides are held in place by "cheese head" screws.
I am careful about where these screws go because my bench is always
a mess and if I loose the screws I don't always have replacements
lying around. The inside of the 1081 module has one large motherboard
with almost all the components soldered to it. The 1081 motherboard
is called a BA312. There are eight plug-in amplifier modules.
The next GIF shows the channel amplifier with the amplifier modules
isolated
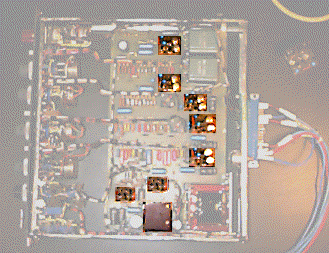
and the three types of amplifier are shown in the next GIF
.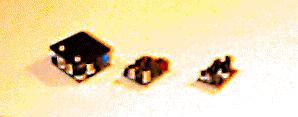
The BA340 output amplifier is on the left, one of the five BA338
amplifiers is in the middle and one of the two BA306 dual voltage
followers is on the right. In some modules these amplifiers screw
down to the motherboard but that is not the case with the one
that I have. The BA340 has shaken out of its socket. This is not
unusual. These amplifier modules have five or six small pins that
fit into sockets set in the motherboard. If they are not screwed
down then they can work their way out especially if the modules
are moved a lot. The heat sink plate on the output amplifier usually
guarantees that BA340 will fall out before any of the others do.
I look at the amplifier for burned components and do a visual
inspection of the whole module. Sometimes things fall in or get
loose. The Hi/Lo switch that selects the mic input impedance was
removed and bypassed - not unusual - it wasn't a great switch.
This is the only mod that I see and it looks like it was done
okay.
After I do my visual inspection I hook the 1081 to the test jig.
I set up the oscillator going into the line input for +4 and the
sensitivity switch for unity gain, EQ switch out and all eq sections
are turned off. I want to be able to turn the power on and hear
the module come up. Sometimes a module will come up and pass signal
for a few seconds before crapping out or it will make some other
noise that may provide a clue. That does not happen in this case.
With the power on I feel the tops of the transistors on the BA340
and BA338 amplifiers to see if anything is going to melt down.
The first time I power up a strange module I want to make sure
I don't have something smoke. Once I feel I can leave the thing
powered I get my O'Scope and poke around to see where the signal
is and where it gets lost. The big place to go first on this module
is a jumper on the test jig that makes the connection where an
external fader would normally go. This point is right before the
output amplifier and is easy to get to. Most of the time when
an amplifier goes in one of these things it is the class AB output
amplifier. It makes sense to see if all is well up to that point...
...and it is. So in a few minutes I have pretty much narrowed
it down. If there was no signal present at the fader insert I
would have gone to the first BA438 (A1) because that is the only
other amplifier in the path with the EQ bypassed. It is easy to
see the output of a BA438 with a 'scope because the two TO-5 transistors
in this amplifier are used "common emitter" so the collectors
have signal on them. Transistors have three "legs" called
the base, the emitter and the collector - the collector is almost
always connected to the case of metal transistors. So sticking
the scope probe right on the can of one of the two big transistors
on a BA438 shows the DC and AC output. If signal is lost between
this first amplifier and the fader insert then the EQ switch is
not making it or maybe there is an open capacitor. It is just
a matter of stepping through until you find signal is not where
it should be.
The 1081 module that I have seems to have a bad output amplifier.
I have some known good spare BA340 amplifiers in my stash so I
swap out the amplifier and the 1081 is still not working. Something
is different though because now when I power the module up signal
passes for a moment and then goes away. It always takes a few
seconds for the amplifiers to turn on but then they should stay
on. My spare 340 amplifier has an odd heat sink on it that does
not cover the components underneath so I can look to see what
is not happy. It almost surely is power related. The input signal
comes into the amplifier but the voltages and biases are all wrong.
It appears that there is only about 6vdc powering this amplifier.
The supply into the rest of the module is good - I checked. Well
the problem is that there is a ten ohm resistor that is no longer
ten ohms. I mentioned that there is a lot of power supply decoupling.
Power to the output amplifier flows through a ten ohm resistor.
There is a big filter cap after the resistor that ties to common
(or B-). It is not uncommon for these low value resistors to change
value when stressed and this one measures about 1500 ohms - it
LOOKS fine. So I changed the resistor and the two large caps associated
with this amplifier. One is the power supply decoupling cap and
the other is the output cap. I still have not gotten to capacitors
yet but since I had to heat up my desoldering tool to change the
ten ohm resistor I figured "what the heck". Now I put
in my spare BA340 and power up - it works. I suspect the original
BA340 is not working and that is probably what made the ten ohm
resistor fail. Now I swap heat sinks so I can have the one that
gives me access on the original amplifier and I power up with
the original BA340 - for about three seconds. I had my fingers
on the tops of the transistors when I powered up and they got
hot awfully fast so I killed the power.
The output amplifier is bad and that means that most likely one
or two of the TO-5 transistors has failed. At this point I take
the easy path. I mark the five metal transistors so I know where
they came from and remove them all from the amplifier. If I did
not have a desoldering tool that worked as painlessly as this
Air Vac I would try and figure out which parts failed by making
in-circuit measurements. Two of the metal TO-5 transistors are
PNP (BC461) and three are NPN (BC441). I give them a quick junction
test with a meter that has a diode test function and find that
one of the transistors is shorted and the other is open. I replaced
the bad transistors and after testing for leakage and other fatigue
indicators I put the others back where they came from. Power on
again and - it works. Now I have a functioning 1081. I let the
output amplifier settle in while I eat lunch and then come back
to check it when its warm.
The BA240 and BA340 amplifiers have a small variable resistor
on them to set the bias. At one end the distortion is high and
the amplifier gets hot - the range of the bias adjustment can
make the output transistors both turn on too far and this will
cause a meltdown. At the other end the distortion is high but
the amplifier stays cool running in Class B. Starting with the
adjustment at the class B end of the range and running with the
output at +20dBv I gradually move the bias adjustment and watch
the distortion drop. There is a point where the distortion stops
falling. This is where I leave it - going any further will not
reduce distortion and will push the amplifier too close to thermal
overload. This adjustment must be done with a heat sink on the
module. Operating the BA440 amplifier with its heat sink off will
result in a melt down.
Before doing any cleanup and restoration work it is best to start
with a functioning module and that seems to be what we have now.
I measure distortion and bandwidth with the EQ in and out and
then run audio through to test how the EQ sections function and
how noisy the switches and pots are. Any loud banging or scratch
noises would indicate a leaky cap or possibly a worn out or dirty
control. If this happens with no signal present it indicates a
leaky cap and DC on the control. This 1081 is pretty okay in these
respects - a small amount of switch noise and pot scratch is present.
In fact the module meets or exceeds the original specification.
I don't think is mandatory that I change out the electrolytic
caps for fresh ones but I do think it is a good thing to do. The
customer asked me to change the caps while I had it in the shop
anyway. Old caps can fail altogether. When they do that they generally
open up so nothing gets through. Electrolytics can also get leaky
so they let through some of the DC they are there to block. I
mentioned above that caps can dry out and the value will reduce
over time. It is not a bad thing to change out the caps for preventative
reasons.
There are a total of 19 aluminum electrolytic capacitors used
in the 1081 channel amplifier. Here is a GIF of the module with
the caps isolated
.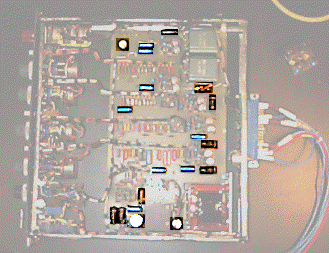
Sixteen are axial caps that have one lead out of each end and
the body of the cap lays flat on the circuit board. Of these axial
caps eight are 100MF @ 25vdc and eight are 150MF @ 16vdc. There
are three radial caps that have both leads out of one end and
the body of the caps stick up from the circuit board. These radials
are 470MF @ 16vdc and 25vdc.
Guidelines for electrolytic cap change-outs are as follows. The
replacement cap should have the same form factor. Axial caps should
be replaced by axial caps and radials should be replaced by radials.
Sometimes you can't get the right thing but try. The voltage rating
of the new cap can be higher than the old cap but don't use a
cap rated for a lower voltage. The capacitance value of the new
cap should be the same or higher than what was there originally.
Most of the time these caps are used as power supply filters or
as audio bypass caps. Here the important thing is for the cap
value to be big enough. Designers often pick a value that is ten
times the minimum required to pass signal or do the filtering
job. They know that the caps will degrade over time. Using too
big a value is hard to do because the cap will get too large to
use and keep in mind that the bigger the cap is the more internal
resistance and inductance there will be. Sometimes I find circuits
where an aluminum electrolytic is used as a frequency determining
component in an EQ or audio filter circuit. These have to stay
the same value. This mostly happens in speaker crossovers and
I generally replace these with a film cap of some sort that won't
change over time. The temperature rating of the cap should be
105 degrees centigrade. These caps last longer than the 85 degree
ones. More than one console manufacturer used 85 degree rated
caps throughout their product for years and as the caps began
to fail after five or six years in those hot modules it became
a big problem - with almost a two hundred caps per channel in
one case- that's a lot of caps! OOPS! Use good caps.
I use caps that are good and that I can get. There are several manufacturers of really zippy aluminum electrolytics. I use Panasonic caps because they are cost effective and after I did some tests I was pretty happy with the sound quality as compared to more esoteric, expensive and hard to get caps. In the Digi-Key catalog (which you can get by calling 1-800-344-4539 or 1-800-DIGI-KEY) there are a bunch of different Panasonic Caps. For doing Neve and API recapping I most often use the HFS series because they are compact, 105 degree rated, low leakage, low inductance and come in both axial and radial form factors. Digi-Key also sells a few other types. Panasonic HF(U) are sonically better than HFS - slightly - but they are bulky and cost twice as much. The cost is less a factor than the bulk. The Panasonic NHE caps are good solid caps and they are small - in fact if you have, say, a Neve V-III module that needs new caps you would find that these are about the only ones from Panasonic that fit. Other manufactures of good aluminum electrolytic caps for audio include Roederstein, Nichicon and Rubicon (Black Gate). All of these caps cost more and are harder to get. I have used all of the caps mentioned but I ended up using Panasonic for the reasons I mentioned above. Any of the caps - including the NHE's - will be better than the originals used simply because capacitor technology has improved that much.
So I replaced all sixteen axial caps with Panasonic axial HFS
series caps that were 220MF @ 25vdc and I replaced two of the
radial 470MF caps with a radial HFS series cap with the same value
rated at 25vdc. The third radial is used for power supply filtering
at the output amplifier and that I replaced with a 1000MF @ 35vdc.
To remove all the original caps I have to be careful not to rip
up pads and traces. The way I do that is I cut the components
off the top of the circuit board and then remove each individual
lead one at a time. I check one more time to make sure none of
the caps are in the wrong way - caps are polarized and especially
in the type of circuitry you find in old Neve gear the polarity
has to be maintained. A cap will fail - sometimes pretty dramatically
- if it is put in backwards. Polarity and other caps issues will
be discussed in another article - one of several I have that are
about half written. Once the caps are soldered in I clean the
controls - and this is another article all by itself - chemicals.
I use a product called Lextend. I spray it on all the switch contacts
while operating the switches and I even use it in the pots - which
are open. This is the most all around effective and trouble free
cleaner lubricant I have found. I buy cases of the stuff.
After I have checked for a third time to make sure I have clipped
all the leads and there are no bits of wire in the wrong place
I connect the module up and test it again. I compare the new test
result to those before the cap change out and sure enough there
is some small improvement. Notably distortion at unity gain with
+4dBv input going into the line input and all EQ in but flat was
.03% at 100Hz and 10KHz and now it is down to .022% at 100Hz,
.015% at 1KHz and .010% at 10KHz all else the same. That could
have resulted from cleaning the controls - maybe. The other place
I see an improvement is in bandwidth. The low frequency was 1dB
down (from 1KHz) at 18 Hz before and now this happens at 13Hz.
The high frequency was 1dB down (from 1KHz) at 20KHz and that
is now happening at 22.5KHz. Small improvements but improvements
none the less.
I checked all functions - the switches and pots are quieter and
don't make any noise with no signal present. If you have pots
that scratch and switches that grind and click with no signal
present that may indicate a bad pot or switch but it is more likely
a leaky cap letting DC onto the control. The act of switching
DC or turning a pot with DC on it turns that inaudible DC into
very audible AC audio... but I said that before.
So now the module is done and I'll burn it in for a few days,
test it one more time and then ship it to the customer. That concludes
my blurb. You can write to me here at (The BBS where this was
first published has sunk so e'mail me at contacto2016@technicalaudio.com).
Here is one last GIF
. 
Two of the things you see next to the Neve Module are... LEXTEND
- you can get LEXTEND from a company called Chemsearch at 1-800-527-9921
(in Texas it's 1-800-442-7950). That is one of my magic chemicals.
Now Chemsearch will only sell cases of twelve for a little over
$200 so call your audio parts vendor and harass them into buying
a case so you can then buy one can. The blue soldering iron thing
is an AIR-VAC desoldering tool. This tool makes my life better.
You need a supply of compressed air at around 100psi to make it
go- I bought a Sears air compressor. Between the air compressor
and the tool you are in for about $500 - which is half what a
workable bench desoldering station costs.... and you get the compressed
air to blow hairballs out of equipment with to boot! Air Vac is
in Connecticut at 203-888-9900 and the model of the one I have
is the PVSG-60-E. It comes with all the stuff you need to start
except for maybe a fitting to connect the air supply line - get
that at a hardware store or Sears. The Air Vac tool is resting
on the little blocky heat sink that I use when I want to run the
BA440 output amplifier AND have access to make measurements and
bias adjustments.
Have Fun
SOME ADDITIONAL NOTES ABOUT CHEMICALS AND CLEANING AGENTS...
Lextend is no longer available. Chemsearch is trying to come
up with a replacement for it that is Ozone Friendly. I laid in
a supply for my shop just before it disappeared... I can't sell
any of what I have - sorry. So far I have not found anything quite
as good but it appears that the products from CAIG Labs are coming
back into favor in our shop. These are "De-Ox-It, Preserve-It
and Pro-Gold" and are available through many audio oriented
re-sellers. The Prices on CAIG stuff varies over a very wide range.
I bought a can of Pro-Gold at one 48th street store (my shop is
right on the corner of 48th and 7th in Manhattan where all the
music stores are) for $14 - my brain was turned off - these are
little cans!... anyway I was at another place across the street
a week later and the same stuff was available for around $7 a
can. I inquired into this and it turned out that the two competing
stores were buying the stuff from different places. Oddly enough
the more expensive cans were sourced directly from CAIG while
the less expensive cans were sourced from one of the big pre-made
cables and accessories companies. This leads me to believe that
if you buy enough at one shot from CAIG it would be even cheaper
- but I have no desire to stock truckloads of chemicals so I won't
investigate this.
An update on the search for a Lextend replacement. Chemsearch
is making two cleaner/degreasers. Both are versions of Lexite
which is the cleaner portion of Lextend. Lexite is the original
version but it will go away at some point. Lexite PS is Ozone-Safe
and so far seems to be able to clean (not lubricate) switches
and controls safely and to positive effect. We have been trying
a lubricant called Mist Oil that comes from a Chemsearch division
called Multi Mist and so far that seems to be doing the trick.
It seems that Lextend was a blend of Lexite and whatever lube
is in the Mist Oil but the really Ozone unfriendly stuff was what
was able to make them live in one can... ...whatever.
Another cleaning trick for silver contact switches - this would
include some of the EQ switches and is most helpful on the hi
and low pass filter switch assembly. Silver Switches? Try TARNEX.
Tarnex is one of those As-Seen-On-TV products where the horribly
tarnished silver spoon is simply dipped into a little bowl of
Tarnex and out it comes bright and shiny. After cleaning and degreasing
and before re-lubricating we use syringes to carefully apply Tarnex
to switch contacts and commutators (the slide contact that carries
the common around). After a few minutes we flush it out thoroughly
and the contacts are no longer tarnished. We then re-lubricate
the assembly and it works like new. Tarnex is available in the
home cleaning products section of many stores.
SOME ADDITIONAL NOTES ON PANASONIC AXIAL CAPS
Well - a big bummer - it appears that Panasonic axial caps are no longer being made. The HFS series axials are a key component that I use to recap modules from Neve and many others. I buy lots of parts from Digi-Key. Digi-Key has started stocking various BCC (formerly) Phillips capacitors as a replacement axial cap. These BCC caps are the modern day versions of the original ones used in Neve modules. It turns out that the best of the BCC caps I have found are more inductive and have higher internal impedances than the Panasonic HFS caps so I have been laying in stocks of key values of Panasonic HFS series axial caps when I can find them. I am also searching for an acceptable substitute.... sorry - I am not selling loose HFS axial caps.